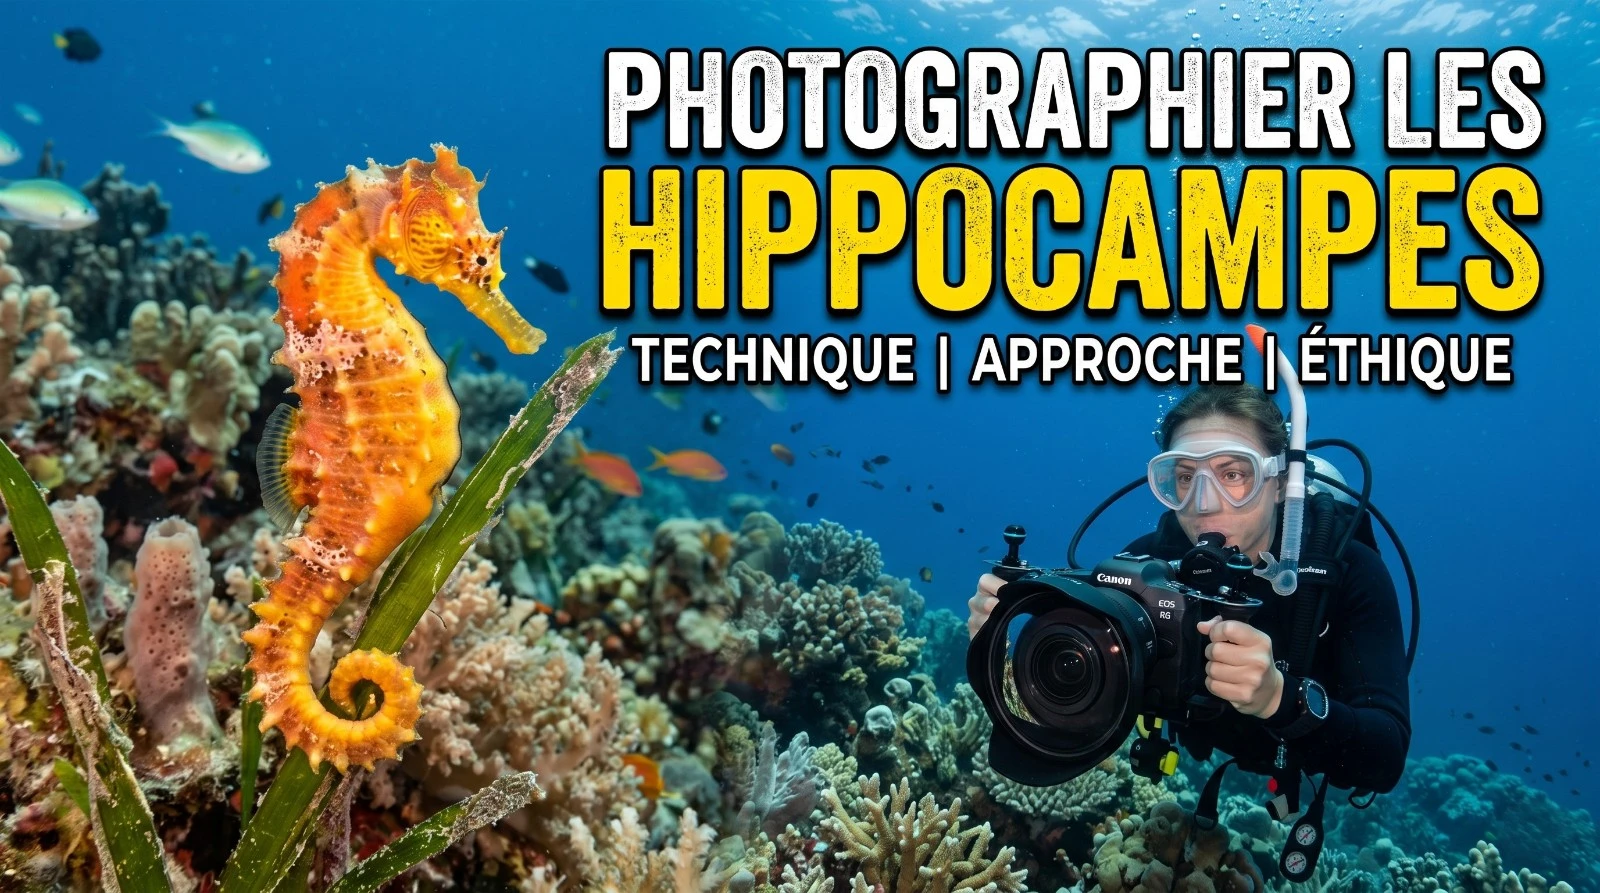
How to photograph a seahorse without stressing it: where to find them, how to approach, which settings in natural light and which ethical limits to respect.
There is one thing about seahorses that took me a long time to understand, and it had nothing to do with gear.
On a dive along the Catalan coast, in a seagrass bed I know well, a beginner I was guiding spotted a seahorse hooked onto a posidonia stem. Within seconds he closed in, housing first, almost touching the animal. The seahorse turned a dull brown, looked away, then unrolled its tail and slipped lower. The photo never happened. The diver was disappointed, yet he had done exactly what his instinct told him to do: rush the rare subject.
That is the founding mistake. The seahorse is the icon of underwater macro, but it is also a vulnerable animal that reads our trajectory before our intention. Learning to photograph it means first learning not to frighten it.
A seahorse is not a trophy
At AquaExposure the hierarchy is clear: safety first, ethics next, aesthetics last. With a seahorse this hierarchy is not a slogan, it shows up in the photo. A stressed seahorse is recognisable in the image: faded colour, closed posture, evasive gaze. A relaxed seahorse keeps its tones, its coiled tail, and that almost sculptural presence that gives the subject all its beauty.
The position is simple. The good seahorse portrait is not the one where you got the closest, it is the one where the animal never noticed it was being photographed. That idea changes the entire way you dive.
I develop this logic in the article on the scenography of erasure, which explains why becoming invisible is the most profitable skill an underwater photographer can have.
Where to find seahorses
You do not stumble onto a seahorse, or rather you swim past it without seeing it. Their strength is camouflage. In the Mediterranean two main species occur: the long-snouted seahorse and the short-snouted seahorse. Both live in the same habitats, between five and twenty metres.
The habitats to scan
Posidonia seagrass beds are the number one hunting ground. The seahorse hooks on with its tail, motionless, and waits for the current to bring it plankton. Also look on muddy-sand bottoms with algae, around gorgonians, and on submerged structures such as ropes, mooring chains and old buoys. These fixed objects give them a perfect anchor point.
The spotting technique is the same as for other discreet subjects. I detail it in the article on spotting and patience in macro: move slowly, sweep the walls at a constant speed, and learn to recognise a silhouette that stays still in a decor that sways.
In Southeast Asia, around Indonesia and the Philippines, diversity explodes, with tiny pygmy seahorses clinging to gorgonians. These subjects demand dedicated macro gear and a local guide's eye, but the approach principle stays identical.
The approach: the part that really matters
Eighty percent of a seahorse photo is decided before the first shutter release. Pure technique comes after.
Stabilise your buoyancy first
A seahorse lives in a space of a few centimetres. If your buoyancy is not neutral, you will stir sediment, bump the seagrass, or drift onto the animal. Body control comes before camera control. This is exactly the work I describe in the housing handling exercises: the gear must become an extension of the hand so attention stays free for the animal.
Approach at an angle, never head on
Never charge a seahorse frontally. A direct approach is read as a threat. Position yourself at an angle, drop down to the animal's level, and advance in small steps with pauses. Between each pause, watch its reaction. If it keeps its colour and posture, you can move a little closer. If it starts changing tone, you are already too close.
Read the signs of stress
Three signals force an immediate retreat. The first is a colour change, when the seahorse turns a duller shade to disappear. The second is the repeated turning away of the head. The third is the unrolling of the tail, a sign that it is preparing to flee. These signs are not negotiable. As soon as one appears, the session is over, with or without the photo.
Photo technique in natural light
Once the approach is mastered, the settings are almost simple.
Focus on the eye
The seahorse's eye is the point of attention for the whole photo. That is where focus must land, not on the snout or the support. On a smartphone in a housing or a GoPro fitted with a close-up lens, tap the screen on the eye to lock focus. In a short burst, keep the frame where the eye is sharpest.
Why no direct flash
A frontal flash aimed into a seahorse's eyes is an aggression. Between five and fifteen metres in daylight, natural light is enough for a clean portrait. Deeper, or in dark zones, a low intensity continuous light, angled from the side and never on the eyes, is the only acceptable option. I explain this no-flash discipline in detail in the article on the four exceptions where flash becomes necessary. The seahorse is not one of the cases that justify a burst.
Frame from below
The beginner's reflex is to shoot the seahorse from above, which pins it to the bottom and flattens it. Instead, place yourself at its height or slightly below, shooting upward. This viewpoint restores its verticality and dignity, and lifts its silhouette off the background. The negative space of the blue or green behind it does the rest, a principle I develop in the underwater composition guide.
Ethics and regulation
Seahorses are listed in Appendix II of CITES and protected by several national regulations. In practice this forbids capturing them, handling them, unhooking them from their support or moving them to improve a frame. The field rule is crystal clear: you photograph the scene as it is, you never rearrange it.
This responsibility goes beyond the single animal. The underwater photographer has an ambassador's role, a subject I cover in the article on the role of the photographer in ocean protection. A seahorse photo made cleanly tells the story of a respectful encounter. A photo torn from a stressed animal tells another story, and it shows.
If you want to go further, your seahorse images can even serve research. Citizen science programs survey populations, and your dated, geolocated photos have real value there, as I explain in the article on ethical photography and citizen science.
Building your patience
The seahorse teaches the same lesson as the turtle. It rewards those who slow down. The first time, you will likely come back with an average image and a lot of frustration. The tenth time, you will know how to settle, wait, and let the animal get used to your motionless presence.
This is exactly the progression you train by exploring other discreet macro subjects, described in the guide to hidden macro subjects beyond nudibranchs and in the reference macro guide on nudibranchs. The more small living subjects you photograph while respecting their space, the more natural the seahorse approach becomes.
Seahorse macro is not a matter of luck or expensive gear. It is a matter of behaviour, yours. Learn to make yourself invisible, and the animal will give you the pose. To structure this approach step by step, from spotting to composition, that is exactly what we work on in the AquaExposure course.
Share
Table of Contents
- 01A seahorse is not a trophy
- 02Where to find seahorses
- 03The habitats to scan
- 04The approach: the part that really matters
- 05Stabilise your buoyancy first
- 06Approach at an angle, never head on
- 07Read the signs of stress
- 08Photo technique in natural light
- 09Focus on the eye
- 10Why no direct flash
- 11Frame from below
- 12Ethics and regulation
- 13Building your patience
Questions about the Journal
Where can I find seahorses in the Mediterranean?
In posidonia seagrass beds, on sandy bottoms with algae, and clinging to gorgonians or submerged ropes between five and twenty metres. They usually hold on with their tail wrapped around a stem. Search slowly, close to the bottom, without stirring up sediment. A local guide who knows the usual spots saves hours of searching.
Do I need a flash to photograph a seahorse?
Not in daylight at shallow depth. Between five and fifteen metres natural light is enough for a clean portrait. A direct flash into a seahorse's eyes must be avoided. If the animal lives in a dark zone, a low intensity continuous light, never aimed at its eyes, is preferable to a frontal burst.
How do I know if a seahorse is stressed by my presence?
Three signs are unmistakable: it changes colour to blend into the decor, it turns its head away repeatedly, or it unrolls its tail and tries to move off. As soon as one of these appears, back off. A calm seahorse keeps its colour and stays quietly hooked to its support.
What settings for a seahorse on a smartphone or GoPro?
A close-up wet lens on the housing, focus locked on the eye, and a slightly underexposed image to keep the detail in the eyes and snout. Stabilise yourself on a neutral support, never on the seagrass. Shoot a short burst to keep the frame where the eye is sharp.
Is it legal to photograph a seahorse?
Photographing yes, handling no. Seahorses are protected under CITES (Appendix II) and by several national regulations. Touching them, unhooking them from their support or moving them for a photo is forbidden and dangerous for the animal. The rule is simple: you photograph what you see, you never rearrange the scene.
Why is my seahorse always blurry in my photos?
Three causes recur: focus lands on the support instead of the eye, you are too close and below the minimum distance of your lens, or your own buoyancy shifts at the moment of release. Back off a few centimetres, lock focus on the eye, and breathe out fully before shooting.
How long can I stay near a seahorse?
As briefly as possible to make a good image, and never to the point of changing its behaviour. A few minutes are enough when the approach is clean. If the animal shows a sign of stress, the session is over, even without the photo. The seahorse comes before the image.

